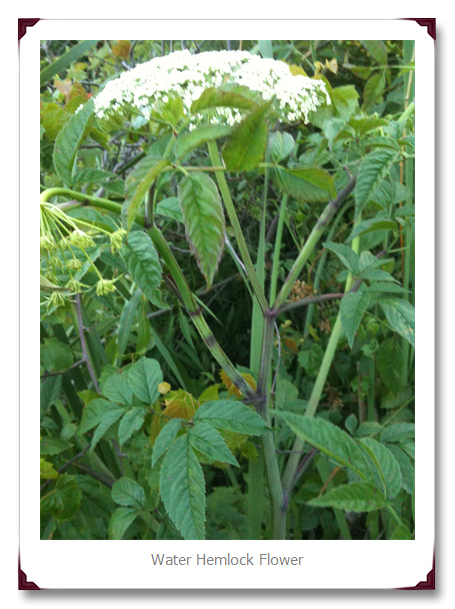
We are lucky to have elderberry growing all around us. We found them everywhere after taking a Weed Walk class by Green Dean of Eat The Weeds. Wouldn’t have really recognized them before that. Apparently people get elderberry confused with water hemlock, which is extremely poisonous. After Dean showed us the two I couldn’t really see how they could be confused with each other, but I suppose if you aren’t that plant savvy it might be an easy thing to mix up. The plants look completely different to me.
However, the flower heads and berries look vaguely alike if you don’t look at the leaves or the stalks. Here’s a not-so-great picture of water hemlock I took from my phone while Honey and I were out walking. The stalks and leaves are completely different, but this shows the similarity of the flowers. Water hemlock stalks are not woody and they have purple areas on them. The leaves are less smooth and the veins are very pronounced with jagged edges, where elderberry has smoother leaves & veins and are a bit more lanceolate in shape. Water hemlock leaves seem a bit more ovate in shape to me.
Water Hemlock is super poisonous. Please take the time to know the difference between the two plants. Dean told a tale of two boys who made a flute out of a hemlock stalk and just putting the dried stalk to their mouths they both died from it before anyone really knew what had happened.
A VERY important thing to understand if you are going to forage for wild foods ~ KNOW YOUR PLANTS WELL!!! Know the subtle differences between look-a-likes. It could be the difference between life and death.
Ok, back to our gardening….
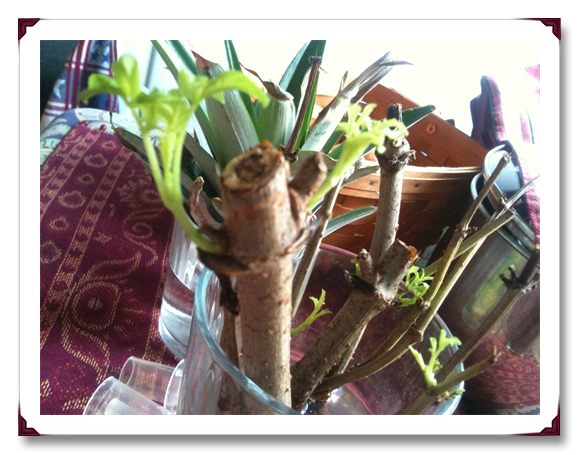
While we were around our neighborhood checking for ripe elderberries, we took some cuttings and brought them home to root. If you saw the pictures I posted to my Facebook page then you’ve already seen these two that I took with my phone:
This first one, above, is right after bringing the cuttings home and placing them in water.
The 2nd one, below, is a week or so later after they sprouted leaves before they even grew any roots.
Now they are planted in our homemade compost soil. I will be putting a couple of these out in our yard, but keeping some in the bucket as well, since we don’t plan on living here forever. I definitely want to have some established to take with us some day.
Elderberries are extremely easy to start from cuttings. All I did was put the sticks in water and refreshed it every day with filtered water.
I’m going to start up an Herb of the Month series, where each month I’ll be doing an in depth study of a featured herb including all the different ways to use each one. One of my goals is to become a Master Herbalist, but cannot yet swing for an official course. So I must learn on my own for a while. 🙂
This post is shared on:
Homestead Barn Hop #125
The Homesteader Hop 6th Edition
Wildcrafting Wednesday 8.28.13


Did you root them in the fall? Is that the best time to try to start the cuttings?
No we didn’t. Last fall we weren’t aware that we were surrounded by elderberries. So we’re a little late on getting this done and it’s really an experiment at this point. We gathered the cuttings and put them in water a couple of weeks ago. They seem to be growing well though. The pic of them planted in the bucket is from yesterday.
when you plant them make sure to put a cup full of 10-10-10 fertilizer into the soil, make sure your hole is at least 2-3 feet wide with lose soil, they do not have deep roots so give those roots a place to spread. Make sure to mulch the area around the new planted Elderberry for a year or two so they don’t have to compete for nutrition with the weeds because of their extreme shallow root system you do not want to use a hoe to work the weeds and do not just rip them out you may damage the elderberry roots, rather mow them, taking care not to mow down the new shoots that will start from the roots. If you want to harvest berries you will have to have 2 different types of elder berry bushes within about 100ft of each other…go were you found them and look close at the bushes. Some of them have a slight different bark you need one or more of them with the others. They are all black elderberries but of a different species. without you having 2 different ones you will not get much harvest from them. Be prepared for them to take off like weeds and take over the yard.
Pingback: My Homepage
I would really love to grow this wonderful plant in my garden, I use elderberries and flowers frequently. Just have to track down a plant I can get a cutting from now. Great post. Followed you from the Homestead Barn Hop.
Love for you to come by Wildcrafting Wednesday and share.
http://www.herbanmomma.com/2013/08/wildcrafting-wednesday-8-28-13/
Great post, what type of climate/soil/water do elderberries prefer? Thank you!
From experience they seem to like quite a wide range. I’m in north Florida, so our soil is very sandy with a long hot weather season. When I was in northern California I saw them growing well there too. Cornell University’s website states “Elderberries grow best in moist, fertile, well-drained soil with a pH between 5.5 and 6.5, but will tolerate a wide range of soil texture, fertility, and acidity.” It also says they can tolerate to zone 4 and sometimes 3. I’m in zone 9a and they are doing wonderfully here! I didn’t do anything special to my cuttings but mix the sandy soil from my yard with some compost from my compost pile. I figure if they grow wild here then they shouldn’t need a lot of extra help from me. 😉
Terrific, thank you! I’m in Southern California, Zone 10a. I think I’ll give them a try. Looks like a perfect fit 🙂
You’re welcome! I’d love to know how it works out for you, feel free to post pics to my FB page. 😀
Will do! Thanks!! 🙂
You’re welcome ~ any time! 😀
Wow. Amazing post. Thank you so much!
It’s fall right now, any chance that I could take cuttings now? Or is it best to wait for the spring?
I’ve read that it’s best to take cuttings from June – August. But I don’t always follow the rules. 😉 Go ahead and get some cuttings and put them in water to see if they start. I would bet they do. But if not, then just get more next summer and start over. My cuttings from last year are still thriving and with a ton of new growth – and I haven’t even put them in the ground yet. They’re still in the bucket I planted them in. 🙂
They grow all over southern California where I’m from. I went to Sequoia this last summer and saw them growing at 7,000 feet elevation but ALL bushes – no trees. I guess they freeze to the ground every winter and Sprout from there every spring……..big berries and huge clusters. None seen anywhere near Yosemite though. Zero…… Wierd